understanding: rented-vms
Let’s talk about rented VMs on public clouds. As someone who’s used free tiers extensively, I wanted to understand what I’m actually paying for when moving to paid instances.
When you spin up a VM, you’re getting a slice of a physical machine, isolated from other tenants.
Why bother with this setup? Because running your own hardware is a pain:
- 24/7 uptime management
- Scaling hardware resources
- Networking and IP allocation
- System maintenance and updates
- Security (firewalls, anti-malware)
- Power costs
Most cloud providers use KVM for virtualization. It turns the Linux kernel into a hypervisor to run multiple isolated VMs on one physical box.
To understand your VM’s capabilities, need to know its allocated resources. Start by checking the basic system info after provisioning-
Command: lscpu
Run lscpu to see CPU and virtualization details:
ubuntu@b2-7-us-west-or-1:~$ lscpu
Architecture:            x86_64
  CPU op-mode(s):        32-bit, 64-bit
  Address sizes:         40 bits physical, 48 bits virtual
  Byte Order:            Little Endian
CPU(s):                  2
  On-line CPU(s) list:   0,1
Vendor ID:               GenuineIntel
  Model name:            Intel Core Processor (Haswell, no TSX)
    CPU family:          6
    Model:               60
    Thread(s) per core:  1
    Core(s) per socket:  1
    Socket(s):           2
    Stepping:            1
    BogoMIPS:            4788.90
Virtualization features:
  Virtualization:        VT-x
  Hypervisor vendor:     KVM
  Virtualization type:   full
Caches (sum of all):
  L1d:                   64 KiB (2 instances)
  L1i:                   64 KiB (2 instances)
  L2:                    8 MiB (2 instances)
  L3:                    32 MiB (2 instances)
NUMA:
  NUMA node(s):          1
  NUMA node0 CPU(s):     0,1
...some more
Observations:
- Virtualization Technology: The line
Virtualization: VT-xindicates the CPU supports Intel VT-x, a hardware feature that enhances virtualization performance. - Hypervisor:
Hypervisor vendor: KVMconfirms that KVM (Kernel-based Virtual Machine) is the underlying hypervisor, managing multiple VMs on a single physical server. - NUMA Configuration: The presence of NUMA (Non-Uniform Memory Access) nodes suggests optimized memory allocation based on proximity to CPU cores, improving performance for memory-intensive tasks.
First, update package lists and install hwloc:
apt update
apt install hwloc
Then, generate a visual representation of system’s topology:
lstopo --of png system_topology.png
This command creates a visual layout showing the arrangement of CPUs, caches, and memory.
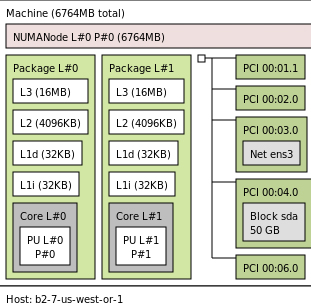
Observations:
Two packages, each with one core and one PU. Total of two physical CPU cores.
NUMA nodes present. Means memory access is optimized based on which core is closest. Can help with memory-heavy tasks. NUMA node L#0 P#0 likely shows all the RAM this node can use.
Conclusion
Why bother with this stuff? to know what you’re paying for. We see what’s available, plan accordingly, execute efficiently, and optimize for what we have.
Cheat Sheet
some essential commands to help get to know your system better:
System Information:
lscpu- CPU detailslsblk- Block deviceslshw- Hardware configurationfree -h- Memory usagedmidecode- DMI table contentsnumactl --hardware- NUMA topology
Storage:
df -h- Disk space usagedu -sh /path/to/directory- Directory sizefdisk -l- Disk partitionsmount | column -t- Mounted filesystems
Network:
ip a- Network interfacesip route- Routing tabless -tuln- Listening portsping <hostname>- Connectivity testtraceroute <hostname>- Path tracenetstat -s- Network statsethtool <interface>- Ethernet settings
Performance:
top/htop- Process monitoringiostat -xz 1- I/O statsvmstat 1- Virtual memory statsfree -m- Memory usage in MBsar -u 1 3- System activitynmon- Performance monitoring
Security:
uname -a- System infops aux --sort=-%mem- Processes sorted by memory usagedmesg | tail- Kernel messagesjournalctl -xe- System logschkconfig --list- Service run-level infoufw status- Firewall status